Monday, November 26, 2012

Ghee Cake

Most of them from South India must have heard about Cochin Bakery. They have a cake known as Ghee cake. As the name suggests Ghee is the main ingredient. Its a loaf cake with strong flavor of ghee and extremely soft texture. From my childhood days I have been in love with this cake..I have been searching the recipe from long but there was nothing that I found. At last my search ended here. Though it is pound cake recipe where butter is replaced with ghee. I did remove the lemon zest and reduced the vanilla as my memory of eating the cake brought the flavor of ghee to me. The texture of cake is a bit softer than pound cake.


All Purpose Flour/Maida-2 cups/250gms
Baking Powder-1 tsp
Baking Soda-1/4 tsp
Pure Ghee/Clarified butter-250gms/1 cup+1 tbsp+2 tsp
Powdered Sugar-250gms
Eggs-4 nos(Yellow and White separated)
Milk-1/2 cup
Sugar-2 tsp
Vanilla Essence-1/2 tsp


Method of Preparation:
1. In a bowl sift together APF, Baking powder and Baking Soda.
2. In another bowl, beat together ghee and powdered sugar with an electric beater on medium speed until light and fluffy. Then add egg yolks one at a time, beating well after each inclusion.
3. With the beater on low speed, alternately add flour and milk to Ghee mixture, beginning and ending with flour.
4. In another bowl whisk egg whites, then gradually add 2 tsp sugar and vanilla essence and continue to beat until stiff. Fold egg white mixture in to the ghee mix.
5. Pour in to a well-greased cake tin and bake in a preheated oven of 350F for 50-55 minutes, or till a wooden skewer inserted into the center of the cake comes out clean.


Notes:
1. Ghee cakes have a strong taste and smell of ghee and that is great.
2. Use a pan which holds the batter upto 3/4 of it.


Tuesday, November 20, 2012

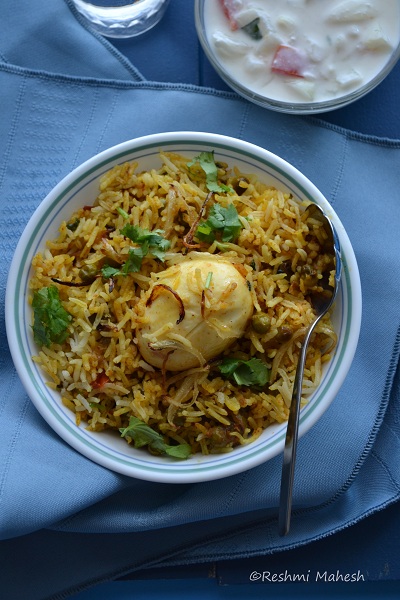
Egg Biryani

A healthy delicious breakfast, small fight with sister, a flavor packed lunch, movie with sis and parents, a visit to the park with friends has been a routine on Sundays during my childhood. Sunday lunch was always special at home. Everyone was there...enough time to enjoy and eat food...is a small part that I still adore...Unlike me Mom used to make variety rice only on Sundays or if guests are around...normal days the meal would be an elaborate one with curries, stir fries, rice, sides..Where as the lazy me loves to prepare variety rice everyday..


This is one such dish from her variety meal recipe...
Egg-3(Boiled and peeled)
Green peas-1/4 cup(frozen)
Ginger garlic paste-1 tbsp
Onion-1 no(thinly sliced)
Tomato-2 nos(big one)
Salt to taste
Onion-1/2 of medium one(thinly sliced)
Coriander leaves-2 tbsp
Oil-1 tbsp
Spices:
Bay leaves-2
Cloves-7 no
Fennel seeds-1 tsp
Cardamom seeds-1/4 tsp
Cinnamon-1 1/2 inch piece
Spice Powders:
Red chili powder-1 tsp
Turmeric powder-1/2 tsp
Coriander Powder-2 tsp
Biryani Masala-1& 1/2 tsp
To cook Rice:
Rice-1 1/2 cup
Water-21/2 cups
Salt to taste
Ghee-1 tsp


 Method of Preparation:
1. Cook the rice 80% with the required water,salt and ghee.Once cooked fluff the rice and set aside.The above measurement is given to cook rice in pressure cooker.
2. Boil and peel the eggs, slit them without cutting to edge and set aside.
3. Heat little oil/ghee in wok and fry the thinly sliced onions till turns golden brown. Drain and set aside.Then add oil in a wok. Add the spices to it and fry for few seconds.
4. Then add onion and ginger garlic paste and cook till it turns translucent. Add spice powders and mix well for a minute till raw smell goes.
5. Add tomato and cook till it is soft and mushy. Add peas and cook covered till it is soft.
6. Cook on low heat. Add a few tbsp of water if really needed.Add salt and mix well.
7. Now add the eggs and  give it a good mix along with a tbsp of coriander leaves.Turn off the heat.


To assemble:
1. Take a pressure cooker and add half of the masala at the bottom. Layer this with rice and add remaining masala and another layer of rice.
2.  Drizzle little ghee on top and close the lid. Cook on low heat with whistle on for 15 to 20 mins. See that it doesn't whistle.
3. Turn off heat and wait till the pressure goes for about 10 mins. Then open the cooker and transfer the biryani to a bowl. Add the remaining coriander leaf, fried onion and serve warm with a squeeze of lemon juice.


Notes:
1. Cook rice in the way you are comfortable with. The rice should be 3/4th cooked and have stand alone grains
2. Instead of cooking the biryani in pressure cooker you can cook it in oven too. In that case preheat the oven to 350F. Grease a baking dish. Layer half the masala and then half the rice. Add another layer masala and then rice. Add the fried onion on top and drizzle ghee on top.Cover and cook for 25 to 30 mins.
3. You can use green bean,carrots or a mix as veggie here.or use no veggie at all too.
4. If using dried variety of peas soak and cook earlier. Then add to the masala and continue cooking.
5. Add salt accordingly.


Thursday, November 15, 2012

Shaped Dinner Rolls

Baking Partners 4th challenge was shaped dinner rolls. Swathi suggested two recipes using which the rolls can be made and there where about 7 shapes from which we need to do any 3. She had given every necessary details for shapes with respective videos.
Now on to my struggle with these rolls...As of it the videos were very helpful and clear. I felt that it was easy to shape..but then while shaping other than clover leaf everything else was a bit tough for me...Shaping was not tough..getting the end product in same shape was. Shaped goods looked good once they doubled but after baking somehow they were terrible..I need to learn by practicing to perfect it. As for the recipe I tried baking the one using egg the Lion House Rolls recipe. The rolls where soft and delicious and was texture wise superb compared to eggless ones that I have baked till now.


All purpose flour-5-5 1/2 cups(bread flour can be used)
Warm water-2 cups (110-115 degrees)
Nonfat dry milk-2/3 cup(instant)
Dry yeast-2 tbsp
Sugar-1/4 cup
Salt-2 tsp
Shortening (butter or margarine)-1/3 cup
Egg-1


Method of Preparation:
1. In the large bowl of an electric mixer, combine the water and the milk powder and stir so the milk powder dissolves.
2. Add the yeast to this mixture then the sugar, salt, shortening, egg and 2 cups of the flour.
3.  Mix on low speed of mixer until ingredients are wet, then turn to medium speed and mix for 2 minutes.
4. Stop the mixer and add 2 more cups of flour then mix on low speed until the ingredients are wet, then turn mixer on medium speed and mix for 2 minutes.
5. The dough will be getting stiff and you may need to remove the bowl from the mixer and mix in the remaining flour by hand.
6.  Add approximately 1/2 cup of flour and mix again. (This can be done by hand or mixer). The dough should be soft, not overly sticky, and not stiff. (It is not necessary to use the entire amount of flour).
7.  Scrape the dough off the sides of the bowl and pour approximately one tablespoon of vegetable oil all around the sides of the bowl. Turn the dough over in the bowl so it is covered with the oil. (This helps prevent the dough from drying out.)
8. Cover with plastic and allow to rise in a warm place until double in size.
9. Sprinkle a cutting board or counter with flour and put the dough on the flour.
10. It is now ready to roll out and cut into desired shape and size of rolls.
11. Place on greased (or parchment lined) baking pans. Let rise in a warm place until the rolls are double in size (approx. 1-1 1/2 hours).
12.  Bake in a 375-degree oven for 15-20 minutes or until they are browned to your satisfaction. Brush with melted butter while hot. Yields 2 to 2 1/2 dozen rolls.

To shape the rolls:
1. Braid:


1. Roll the dough in rectangle form.
2. Cut it to half length wise.Cut to strips of the size of two fingers vertically.
3. Cut each strip to 3, not going all the way top. Now take the strips and braid.
4. Pinch the ends together and turn them down.Set on the tray and let them double in size and off to bake.

2. Clover leaf:


1. Pat the dough about an inch thick.
2. Using a medicine bottle make small balls by pressing bottle against dough.
3. Take  three such balls and drop them in a muffin cup.Let them rise for about 1 to 11/2 hour and then bake.

3. Rose:


1. Use a big glass and cut cut the dough into round form.
2. Apply butter on the inner side. Take two such rounds and make smiley face by pressing it to half.
3. Now hold one end of both smiley face and join then. do the same with the other end. Put them in baking tray. Let double and then bake.

The video for above three rolls is here

4. Knot:


1. Take a small ball sized dough and shape to a 9-inch rope.
2. Roll it and then roll the two side to make it thin,resulting in a  fat thick center and slightly tapering/thin ends.
3. Lay it over your finger and wrap the roll around the finger to form a loop and push one end  up through the middle and tuck the second tail underneath.
4. Place roll on a prepared pan . Let it double and then bake.


The video for knot rolls is here

Notes:
1. Use egg wash to get that brown color.
2. Dab butter immediately once taken from oven.
3. Wrap in a clean kitchen cloth and keep in a box if not using immediately.


Monday, November 12, 2012

Milk Peda- A quick version....


Peda is prepared with milk by stirring it continuously to form a thick mass and then shaped. Here is a quick method to prepare the same...


Milk Powder-2 cups
Condensed Milk-1 can/14oz
Butter-1/2 cup(1 stick)
Pista- to decorate


Method of Preparation:
1. Melt the butter in a pan and then add condensed milk and milk powder to it. Mix well to remove any lumps.
2. Cook on low heat stirring continuously  When the mixture starts to come from sides and forms to lump turn off the heat.
3. Grease your hands with ghee and when the heat of mixture is tolerable by hand make small rounds or discs and press pista on it.
4. Let it cool to room temperature.Serve or keep in air tight boxes and refrigerate.


Notes:
1. Powder you milk powder if they are not smooth.
2. Mix well in order to avoid lumps.
3. Do not increase heat more as the chance of sticking to the pan and browning is high.
4. Do cook till it separates from sides and forms a lump, else the peda will be soft.
5. While rolling the pedas are soft but once cooled the turn firm.
6. Use nuts of your choice.
7. You can add little crushed cardamom powder for flavor.
8. If refrigerated bring it to room temperature before serving.


Sunday, November 11, 2012

Boondi Ladoo


Diwali is a day of lights and sweets for me...As a kid has always enjoyed it by exchanging sweets with our neighbors ..lighting the diya at dusk and bursting fire crackers... As I grew up things changed..we shifted to Kerala...and diwali was no more fun with tons of sweets from neighbors or with crackers...Though we still lighted diya...Dad used to get the sweet boxes from stores which we used to expect north Indian sweets but sadly everything used to be the normal Kerala sweets with small pieces of halwas and regular stuffs...soon we got bored with it...Though after coming to US we really miss those boxes too...This time I decided to prepare some stuffs for my son and hubby to enjoy...
Happy Diwali to all my friends and readers...:)


Recipe adapted from Show me the curry
Besan/Chickpea flour-1 cup
Water-1/2 cup+little more
Orange/yellow color- little
Ghee-1 tsp
Cashews-1 to 2 tbsp
Raisins-1 to 2 tbsp
Cooking camphor- a small pinch.(optional)

For the syrup
Sugar-1 cup
Water-1/2 cup
Cardamom-seeds from 2 pods(slightly crushed)


Method of Preparation:
1. Sieve besan in a bowl, add color to it and mix with water.The dough should be thick with a dripping consistency.
2. In a pan add sugar, water and cardamom seeds and bring it to half string consistency.Turn off heat.
3. Heat oil in a wok on medium heat and when hot pour two spoons of dough on a perforated ladle. Using a tsp tap the ladle so that the dough drips from the holes.See that the difference between the hot oil and ladle is between 1 to 2 inches.
4. Initially you will hear a shhhh sound which starts to fade slowly. When the sound has become feeble remove the boondis from wok and drain on paper towel.
5. Add it to the sugar syrup after 1 to 2 mins.Let it soak there.
6. Now remove all the dough from the perforated ladle completely(wipe off) and continue the process.
7. Heat ghee in a wok and fry the raisins and cashews in it.Drain and set aside.
8. Now once evrything is added to sugar syrup mix it well. Take about 1/2 of the bondi in a mixer and pulse it once or twice.
9. Add this back to the pan with whole boondis,cashews and raisins and give a good stir
10. When the boondi is warm and can be handled by hand, grease hands with ghee. Take little of the boondi and press it slightly to form round shape.
11. Set it aside on plate.Continue the process.
12. Once shaped let them cool completely, and then store in air tight box.


Notes:
1. The thickness of batter is very important. Too thin the batter will flow from the perforation resulting in thin threads instaed of boondi and too thick it wont drop from holes.
2. The distance between the oil and ladle should not be more. It will result in tails in the bhoondi.
3. Do not fry boondis till it is crisp..That is till whole shhh sound stops.It will turn boondi crispy which will not absorb sugar syrup..resulting in crispy ladoos instead of soft ones.
4. The oil should be properly hot.Too low heat will result in rubbery boondis and too hot will result in crispy/burned ones. If heat of oil increases reduce to low and then back to medium while starting the next batch.
5. The sugar syrup should be half thread consistency. ie a drop of sugar  on ur thumb and pressed with ur index finger should stretch half way and break. If sugar syrup reaches one thread consistency then add a little water and get it to half thread. Its very important to get it right else sugar will crystallize resulting in hard ladoos.
6. If the boondi mixture cools off while making ladoos it wont hold round shape. In that case slightly heat the mixture.
7. Initially rolled ladoos will be slightly moist...It will be fine once cooled.
8. While pulsing the boondi mixture do it very carefully. You should not end with a paste. It should just be little crushed.
9. Instead of adding raisins and cashews with mix you can decorate with one on each ladoo.
10. Cooking camphor should be used very little...It has very bold smell and using more of it will result in intolerable smell.Add little by little.
11. Perforated ladle should be wiped after each use. else it will leave tails in boondi.
12. While making boondi do move the ladle to avoid forming lumps.
13. I have used a little green color to get green boondis. In such case take about 1 to 2 tbsp of batter before adding color and then add the desired color.


Saturday, November 10, 2012

Murukku

Murukku is a crispy south Indian snack made of rice and urad dal. It is mixed to form a dough along with some spices. Then it is shaped to spiral form using murukku presser. This is then fried in hot oil. If kept in a air tight box it stays fresh for more than 3 weeks..If anything is remaining...:)


Raw Rice Flour-1 cup(I used pathiri powder)
Urad flour-1/4 cup
Asafoetida/Hing-2 pinch
Cumin seeds-1 tsp
Butter-1 tbsp
Warm water as needed
Salt to taste
Oil to deep fry


To make rice flour:
Raw Rice-1 cup
1. Wash and soak rice in water for 1 to 2 hours.Then drain the water and spread the rice on a clean water absorbing towel.Let the water evaporate and when rice is little moist(not completely dry) grind it to fine powder. Sieve the powder and any big grains should be  powdered again.
2. Now heat a pan and add the powdered rice into it. Stir continuously till nice aroma comes from rice. Do not burn it or let it turn light brown.
Or you can also fry the rice before powdering once it is dry if u fear burning the powders.
3. Store in air tight jars once cooled.

To make Urad dal powder:
Urad dal-1 cup
1. Roast the dal in pan till it turns light brown with a nice aroma.
2. Now grind this to fine powder. Sieve and set aside.
3. Once cooled store in air tight jars.


To make murukku:
1. Take rice flour,urad dal,salt,cumin, hing and butter and mix well.
2. Now add warm water to this and knead to soft, not sticky dough like chapathi dough.
3. Take a murukku press, use the star shaped template and drop some dough to it. Squeeze it to form spiral shape on a parchment paper.
4. Heat oil in a pan and when it is medium hot take the murukku softly by lifting the side of parchment paper and drop to hot oil.
5.  Fry till it turns light brown.Drain and set aside.
6. Store in air tight jars once at room temperature. Stays well for 3 weeks.


Notes:
1. I have used pathiri flour which is roasted rice flour.
2. You can add chili powder to the dough, about 1/4 tsp
3. You can squeeze it on the ladle that you are using to fry which helps you to drop the murukku without breaking and burning your hand.
4. The oil should be medium hot to fry  the murukku till crispy.


Tuesday, November 6, 2012

Chickpea Masala

Laziness crepes into me as the winds starts to blow hard and the temperature forcefully drops low..Now I wud just love to crawl into the blanket and spend the whole winter there...but alas..with a bubbling son around is just difficult impossible...hmmm when there was enough of time for me to sleep during earlier days I sat and wasted it and now when I just want to sleep there is no time...Pathetic right? Anybody out there like me..
Hey ya I made a recipe index for my space..do check it out if interested and I am also having a facebook page..If interested join me there..:)
Anyways todays recipe is a flavor packed spicy gravy made of chickpeas..It goes perfectly with dosas, chapathis,roti,appam,puttu etc..


Chickpea- 1 ½ cups
Ginger Garlic paste- 1 tbsp
onion- 1 medium(Chop in small pieces)
Tomato- 1 nd 1/2(Chop in small pieces)
Green Chili-1
Turmeric powder- 1/2 tsp
Chili powder- ½ tsp
Meat Masala-1 nd 1/2 tbsp
Coriander powder- 1 tbsp
Salt, to taste
Oil-1 tbsp
Cilantro-2 tbsp(Chopped)


Method of Preparation:
1. Soak chickpea in water overnight or for min 4 to 5 hours.
2. Wash and cook the chickpea with required water in a pressure cooker for two whistle  on medium(in case of overnight soaking) or for about 3 to 4 whistles(4 hr soaking).
3. In a pan, heat oil,add sliced onion, green chilli ,ginger-garlic paste  and saute till onion becomes translucent.
4. Add all the spice powders and stir till the raw taste goes.
5. To this add tomatoes and mix well. Cook till tomatoes are soft.
6. Add cooked chickpea with about 1 nd 1/2 cup water from the pressure cooker to make medium thick gravy.
7. Close and cook for 10 to 15 minutes for flavors to be  absorbed by chickpea.Turn off heat.
8. Garnish with cilantro and serve hot with roti,chapathi,appam,puttu,idiyappam,parotta.


ShareThisFinal

LinkWithin

Related Posts Plugin for WordPress, Blogger...