Wednesday, December 26, 2012

Baby Corn Manchurian

Baby corn cooked with a variety of spices to make an Indo-Chinese Manchurian which is perfect with variety rices. These are easy to prepare though you will need lots of baby corn to feed many people. I used about 28 baby corns and got very little(enough for 2). Here I have cut to very small pieces as my kid loves to put the whole stuff into mouth, you can cut each corn to half or as you wish it to be.


To mix:
Baby Corn-24 to 25 nos
Corn flour-1 tbsp
All purpose flour/Maida-1 tbsp
salt to taste
Red chili powder-1/2 tsp
Soya Sauce-1/2 tsp
Ginger-garlic paste-1/2 tsp
Oil- for frying

For gravy:
Onion-3/4 of  small one.
Capsicum-1/2 of medium one.
Garlic-1 clove(minced)
Soya sauce-1 tsp
Salt to taste
Corn flour-2 tsp
oil-2 tsp

For Garnish:
Green chili-1 no(chopped fine)
Onion-1/4 of small one(finely chopped)
Coriander leaves/cilantro for garnish


Method of preparation:
1. Pressure  cook the baby corns for two whistles which makes them tender. Drain the water and set aside. chop them to small pieces and mix with all ingredients under to mix except oil.
2. Keep aside for 20 mins.
3. Heat oil in a wok and deep fry the baby corn till crispy and golden colored.Drain and keep aside.
4. Heat little oil in pan. Fry the garlic and onion till the raw smell of garlic goes. Let the onions cook till it is translucent but crisp.
5. Add capsicum to this and cook till it is soft and has a crunch.
6. Then turn the heat to high and add soya sauce to it along with little salt.Mix and heat it for a minute.
7. Mix the corn flour with 1/2 cup water and pour this to the mixture. Cook it for 2 mins till it starts to thicken. Add the fried corn and give it good mix.
8. Turn off the heat when desired thickness is achieved. Garnish with some chopped green chilies, onions and cilantro. Serve warm.


Notes:
1. Cooking the baby corn makes it tender. Not mushy.
2. You can use any method to cook it. Here I used pressure cooker.
3. Add chili powder to add heat to the recipe. Heat is very less with above quantity.
4. While mixing the corn flour you need not add water as corn will be still  wet after cooking and draining. Just mix everything and after mixing if you feel that the ingredients are still dry, add few drops of water.
5. The above mix amount wont make thick coating over the corn. It will just help to add crunch and spices to corn.
6. Adding raw onion and green chili in the garnish is not compulsory. You can add green chili while cooking too.


Monday, December 17, 2012

Chocolate Crinkle Cookies

As the climate goes cold and the winds start to blow the life outside house is just terrible in Grand Rapids...esp with a 2 year old..So weekends are time when you can do nothing much with those dark gray  days...Its been kind of custom to have parties, get together, fun during this period..Its just food, fun and clean up...Tough I am sure the last one is not enjoyed by any housewife's :)...Lets not go to the whole two weeks back story  the gist of the it is I had made these cookies from here for one of the parties and it was a hit there. When these cookies came out of the oven my son started munching them..when I told him that we are taking it for a party the instant reply was..."Amma kichunna ithu.."(This is for Kichu) and he stuck with this words until he had gobbled a few of the cookies..
  Chocolate Crinkle Cookies are really easy to prepare. You make the dough which has lots of chocolate in it. Then you roll this on powdered sugar which gives it a snow covered look and finally when baked you get to see beautiful cracks on them revealing the chocolate..So by this you should have guessed that these cookies are for chocolate lovers mainly..but I should say that my husband being a not so big fan of chocolate too ate a few of them. That shows how addictive these are. Do try them for this holiday season...They are perfect for this time or for that matter any time..


All Purpose Flour-3/4 cup
Baking Powder-1/4 tsp
Salt-1/8 tsp
Butter-2 tbsp
Bitter Sweet Chocolate-4 ounce
Granulated Sugar-1/4 cup
Egg-1 large
Vanilla Extract-1 tsp
Icing Sugar to roll- about 1/2 cup


Method of Preparation:
1. Melt the chocolate and butter by keeping it in a heat proof bowl over a  simmering  pan of water.Once done remove from heat and set aside to cool.
2. Beat  egg and sugar in another bowl until it is thick pale and fluffy.It should fall like soft ribbon once the beater is lifted.
3. Beat the vanilla into it and then add the chocolate mixture and beat till it is well mixed. Add cooled chocolate mixture and mix till its incorporated.
4. Mix the flour, salt and baking powder in a bowl. Add the dry ingredients to the chocolate mixture till it is incorporated.
5. The dough will be soft so place it in the refrigerator closed  with a lid till it turns firm to form ball.
6. Preheat oven to 325 F and place the oven rack in the middle. Now take the Icing sugar/powdered sugar in a bowl, scoop a small amount of dough(about 1 inch), shape it to ball and then roll it in the sugar. See that the ball is coated well with sugar with no chocolate portion visible.
7. Place them on the parchment lined baking sheet with little gap to spread(about 2 cm) and bake for 8 to 10 mins. Do not over bake them. The sugar coating should not turn brown. The outer should be firm while taking it and the center will be soft.
8. Place them on wire rack to cool. These cookies taste awesome while hot and are great on the day it is baked. It stays good for 2 to 3 days.I don't know more as the cookies never lasted more than that.


 Notes:
1. The dough will be soft, so you need to refrigerate till it turns hard. You can keep the dough overnight.
2. The dough will be very firm and you need to scrape it with spoon, dont worry when you roll it turns moist.
3. The cookie is soft an fudgy like brownies, don't bake it more which will make the cookies dry.
4. Coat the dough balls completely in sugar which will result in look of  beautiful snow covered cookies.
5. You can use semi sweet chocolate instead of bitter sweet ones.
6. As the cookies are kept the sugar coating changes to slight yellow.


Friday, December 14, 2012

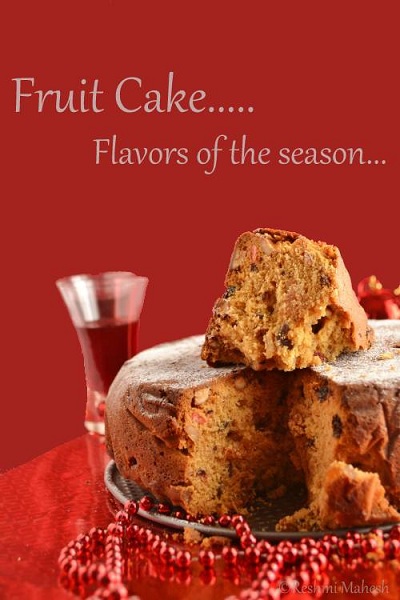
Plum Cake/Fruit Cake

This time Baking Parteners group started by Swathi had three wonderful cakes suggested by Suja and Archana. Before the mail for this months challenge had come I had decided to bake a fruit cake for this X'mas. Once the challenge came and I saw the recipes I wanted to try Brazil nut cake as well as the earlier decided fruit cake..but due to the lack of people to eat I opted to go with just one. I went with the fruit cake which was so perfect for the season. The cake was suggested by Archana and it came out good though there were some issues that I faced which I have mentioned in the notes section. Anyways the cake got over before X'mas...:(. I felt that the cake was getting better as days went.
As for the recipe I had tweaked it little according to our needs. Instead of rum, I have used orange juice. You can use apple juice too.


Fruits Used:
Raisins- 1 cup
Dates-1 cup(chopped)
Candied Orange/Lemon Peel- 1/4 cup, sliced thin
Orange Juice- 1/4 cup
Unsalted Cashew Pieces- 1 cup
All Purpose Flour-1 tsp( to mix with fruits)

Spices Used:
Cinnamon Powder- 1/2 tsp
Caraway seeds- 1 tsp
Ginger Powder- 1/4 tsp
Clove Powder- 1/4 tsp
Nutmeg Powder- 1/4 tsp

For Caramel:
Sugar- 6 tbsp
Water- 3 tbsp
Lemon Juice- few drops
Boiling Water-1/2 cup

For Cake Batter:
All-Purpose Flour- 2 cups
Baking Powder -1 tsp
Unsalted Butter- 2 sticks (8 oz) at room temperature
Powdered Sugar-2 1/2 cups
Eggs- 3 large or 4 medium (separated)
Vanilla Extract-1 tsp
Rum extract-1 tsp


Method of Preparation:
For the Fruts:
1. Soak the fruits and nuts in orange juice in a clean bowl and set aside. Keep it on counter top for a day closed properly with an air tight lid. Then move it to refrigerator and keep it there for 2 days. Before baking take the fruit mixture from fridge and set on counter top.
2. Heat a pan and add the soaked fruits into it and warm it slightly and set aside to cool.Once cold and juts before mixing with batter add a tsp of all purpose flour to the dry fruits and give it good mix. Helps to prevent the fruits form sinking to bottom.

For Caramel:
3. In a small pot, add 6 Tbsp Sugar and 3 Tbsp water and few drops of lemon juice. Swirl pan to mix – do not use spoon.
4. Heat until sugar changes color and becomes caramelized. (approx 7-8 minutes).See that you don't burn it.
5. Add 1/2 cup boiling water and swirl pan again to mix well. Keep aside.

For Cake Batter:
6. In a large mixing bowl, combine softened butter and powdered sugar and beat with hand blender.
7. Add one egg yolk at a time to the mix and blend well.
8. Add Vanilla, rum Extract and blend.
9. Combine all dry spices, baking powder and flour and sift it into the bowl, adding little at a time and blending.
10. Preheat oven to 325 degrees Fahrenheit.
11. Lightly coat 9"/10" baking pans by spraying cooking oil or regular oil.
12. Add caramelized sugar syrup a little at a time into mixing bowl and blend.
13. Add fruit/nut mixture, caraway seeds into mixing bowl and mix with a spoon.
14. In a separate bowl, beat egg whites until they are fluffy and soft peaks form.
15. Fold beaten egg whites into the cake batter.
16. Pour batter into greased baking pans and bake for approx 1 hour  30 mins at 325 degrees F. For smaller pans, baking time may vary.
17. Remove cake from oven and allow it to cool for few minutes in pan and then on rack till it is completely cooled.


Notes:
1. The original recipe used rum which I replaced with orange juice of same amount. 
2. Since rum is not used to mask the egg smell in case it existed I used rum extract. 
3. Caraway seeds are added extra by me. Its optional.
4. To reduce the baking time increase the oven temp to 350 F and bake in middle rack. If top gets cooked earlier use a foil to cover it to avoid blackening of the top.
5. Mixing the dry fruits with all purpose flour prevents it from settling at the bottom.
6. Be careful while making caramel syrup. It tends to burn easily. So keep an eye on it.
7.  I used a 9" spring foam pan lined with parchment paper.
8. Cake got delicious as the days went by.
9. Do increase the amount of sugar used to make caramel to get a darker color for cake. In this case reduce the amount of powdered sugar.You can replace half of the sugar with dark brown sugar too.
10. When I baked at 325 F the outer side of cake cooked faster and the center took long time to cook. But still the center cooks perfect without burning the outer.Just that the time is more.


Tuesday, December 11, 2012

White Chocolate Mousse

A simple elegant dessert....Had bookmarked this long back from here..Turned out yummy for the effort put into making it. I tried it with some fruits as well as some chocolate syrup. Both the toppings where great.


White chocolate chips-1 cup
Whipping cream-1 cup(Low fat)
vanilla-1/2 tsp
Sugar-2-1/2 to 3 tbsp(if needed)


Method of Preparation:
1. Melt chocolate by placing it in a bowl on top of a bowl with  boiling water.
2. Once melted remove from heat and allow it to reach a warm temperature.
3. Whip the cream,sugar(if using), vanilla to stiff peaks.
4. Fold this to chocolate mixture and stir till it mixes well and turns smooth.
5. Pour them to bowls or glasses and freeze for 1 hour.
6. Serve with fruits/fruit sauces,chocolate.


Notes:
1. I added sugar while whipping the cream.
2. If your white chocolate already has vanilla flavor in it then dont add extra vanilla essence.
3. If planing to use sauces dont fill it to the rim as I did.
4. I got 4 small shot glasses of dessert with the above quantity.


Monday, December 10, 2012

Tofu Pepper Manchurian

Last time when we had dinner at Thai restaurant I had the idea of making a tofu  dish with a Chinese twist to it. Here tofu is cooked with pepper and sauces to give a hot and delicious recipe.


Firm tofu-25 1 inch cubes
Pepper powder-1 tbsp
Lemon grass powder-1/4 tsp
olive oil-1 tbsp
Salt a small pinch
Capsicum-1/4 cup(Chopped to small cubes)
Soya sauce-1 nd 1/2tbsp
Tomato sauce-1 tsp
Pepper powder-2 tsp
Salt to taste
Garlic-1 clove(cut to thin slice)
Ginger-1 inch pice(minced)
Shallots-5 nos(sliced thin lengthwise)
Olive oil-1 tbsp
Corn flour-2 tsp
Green onion-1 tbsp(chopped)


Method of Preparation:
1.Dry the tofu using kitchen tissue to absorb max water from it. Slice it and mix tofu,pepper,lemon grass powder,salt, olive oil and set aside for 30 mins.
2. Heat little oil in  a pan and shallow fry turning them till it turns golden brown on all sides.Drain and set aside on kitchen paper.
3. Heat 1 tbsp oil in pan and fry the minced ginger, garlic in it for a second. Add the sliced shallots and fry till it turns translucent.
4. Add capsicum and cook till it gets soft but still crisp for few minutes.
5. Then add pepper powder, soy sauce, salt and tomato sauce,  mix and cook on medium high heat for a minute.
6. Mix the corn flour in little water and add to the mix. Cook it for a minute and then add the tofu into it and continue cooking till the cornflour thicken a bit and tofu is completely coated with masala.
7. Garnish with green onions and serve with rice.


 Notes:
1. Pat tofu before use to reduce its tofu smell.
2. Frying tofu helps to reduce the tofu smell again.
3. Instead of lemon grass powder you can use a small piece of fresh lemon grass.
4. Be careful while adding salt...sauces,fried tofu everything has pinch of salt in it. so add only a small pinch.


Thursday, December 6, 2012

kothu parotta

Like most of the animals that go on hibernation once cold starts I too went into that mode not because of cold but due to the lack of light...Everything about the winter is so good..the cold days...a blanket of snow...the lovely mood of laziness around..except the missing of sun..:( I would have so much loved the presence of sun....
To warm up these winter nights I went with a recipe that is warm and spicy...I was introduced to Kothu parotta for the first time from Vasantha Bhavan hotel in calicut 3 years back...spicy and full of flavors. When we came to US frozen parotta was introduced to me...which I felt was like a thick piece of rubber which never dissolves how much ever you chew it...Sooner dinner with frozen parotta became a challenge and I had to find a way out...I remembered this dish and started to make it...Initially I just added garam masala and it was not much flavorful..then adding one by one masalas was an experiment...I am not sure if this is the traditional recipe/if this is how it is prepared..but this recipe is quite yummy.
A little info about Kothu parotta..It is a Tamil street food which slowly started appearing in hotels these days.  Kothu means: minced pieces and parottas are flat breads made on stove top using all purpose flour and liberal use of oil. In kothu parotta various veggies are  mixed with spices and torn pieces of parotta by using oil liberally.You can use egg too to prepare it and in that case it is known as Mutta kothu parotta.


Parotta-5 nos(cooked and torn/cut to small pieces)
Cloves- 5 nos
Fennel seeds-1 tsp
Cinnamon Stick- 1 inch stick
Bay Leaf- 1 leaf
Curry leaf-1 sprig
Onion- 1 medium(chopped finely)
Tomato- 2 large(chopped)
Carrots-1/4 cup(cut to thin sticks)
Green Beans-1/8 cup(cut to thin sticks)
Cabbage-1/8 cup(cut to fine shreds)
Green peas- 1/4 cup(I used frozen)
Ginger-garlic Paste- 2 tsps
Chili Powder- 2 tsp
Turmeric Powder- 1/2 tsp
Garam Masala- 1 tbsp
Biryani  Masala - 2  tbsp
Cilantro/coriander leaves for garnish
Oil-5 tbsp


Method of preparation:
1. Heat  oil in a pan. Add cinnamon,fennel,clove, curry leaf,bay leaf and fry for a minute. Then add ginger garlic paste and fry till raw smell goes. Add onion to this and fry till translucent and light brown.
2. Add tomatoes to this along with a pinch of salt and cook till it turns mushy and oil separates at sides.
3. Add turmeric,chili, garam masala and biryani masala and mix well and cook for a minute.
4. To this add the green beans, green peas along with carrot and mix well and cook till it is half done.
5. To this add the shredded cabbage and cook till it is soft yet crisp.Now add salt and mix well and cook for a minute or two.
6. Add the shredded poratta to this and mix well. Cook on medium heat for few minutes.Turn off the heat and garnish with cilantro
7. Squeeze little lemon over it and serve with raita.


Notes:
1. I used store bought frozen Kerala parotta which is widely used for this. You can make the same with chapathi too.
2. Be liberal in using oil.Add more if needed. The porotta should be fried in oil while cooking.
3. Before adding the tomatoes see that there is no much liquid which would result in soggy porottas which is a big NO.
4. You can use pav masala, chicken biryani masala in place of biryani masala too.
5. Add spices according to your level.
6. Add about 2 green chilies if you like heat.
7. If using small porottas use about 6 to 7.
8. You can use veggies of ur choice.Add or remove veggies as you like.


Monday, November 26, 2012

Ghee Cake

Most of them from South India must have heard about Cochin Bakery. They have a cake known as Ghee cake. As the name suggests Ghee is the main ingredient. Its a loaf cake with strong flavor of ghee and extremely soft texture. From my childhood days I have been in love with this cake..I have been searching the recipe from long but there was nothing that I found. At last my search ended here. Though it is pound cake recipe where butter is replaced with ghee. I did remove the lemon zest and reduced the vanilla as my memory of eating the cake brought the flavor of ghee to me. The texture of cake is a bit softer than pound cake.


All Purpose Flour/Maida-2 cups/250gms
Baking Powder-1 tsp
Baking Soda-1/4 tsp
Pure Ghee/Clarified butter-250gms/1 cup+1 tbsp+2 tsp
Powdered Sugar-250gms
Eggs-4 nos(Yellow and White separated)
Milk-1/2 cup
Sugar-2 tsp
Vanilla Essence-1/2 tsp


Method of Preparation:
1. In a bowl sift together APF, Baking powder and Baking Soda.
2. In another bowl, beat together ghee and powdered sugar with an electric beater on medium speed until light and fluffy. Then add egg yolks one at a time, beating well after each inclusion.
3. With the beater on low speed, alternately add flour and milk to Ghee mixture, beginning and ending with flour.
4. In another bowl whisk egg whites, then gradually add 2 tsp sugar and vanilla essence and continue to beat until stiff. Fold egg white mixture in to the ghee mix.
5. Pour in to a well-greased cake tin and bake in a preheated oven of 350F for 50-55 minutes, or till a wooden skewer inserted into the center of the cake comes out clean.


Notes:
1. Ghee cakes have a strong taste and smell of ghee and that is great.
2. Use a pan which holds the batter upto 3/4 of it.


Tuesday, November 20, 2012

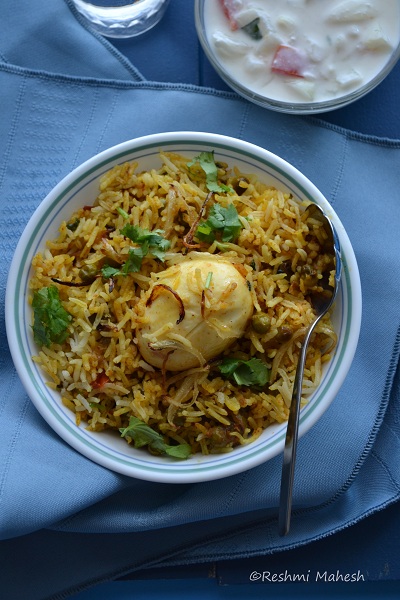
Egg Biryani

A healthy delicious breakfast, small fight with sister, a flavor packed lunch, movie with sis and parents, a visit to the park with friends has been a routine on Sundays during my childhood. Sunday lunch was always special at home. Everyone was there...enough time to enjoy and eat food...is a small part that I still adore...Unlike me Mom used to make variety rice only on Sundays or if guests are around...normal days the meal would be an elaborate one with curries, stir fries, rice, sides..Where as the lazy me loves to prepare variety rice everyday..


This is one such dish from her variety meal recipe...
Egg-3(Boiled and peeled)
Green peas-1/4 cup(frozen)
Ginger garlic paste-1 tbsp
Onion-1 no(thinly sliced)
Tomato-2 nos(big one)
Salt to taste
Onion-1/2 of medium one(thinly sliced)
Coriander leaves-2 tbsp
Oil-1 tbsp
Spices:
Bay leaves-2
Cloves-7 no
Fennel seeds-1 tsp
Cardamom seeds-1/4 tsp
Cinnamon-1 1/2 inch piece
Spice Powders:
Red chili powder-1 tsp
Turmeric powder-1/2 tsp
Coriander Powder-2 tsp
Biryani Masala-1& 1/2 tsp
To cook Rice:
Rice-1 1/2 cup
Water-21/2 cups
Salt to taste
Ghee-1 tsp


 Method of Preparation:
1. Cook the rice 80% with the required water,salt and ghee.Once cooked fluff the rice and set aside.The above measurement is given to cook rice in pressure cooker.
2. Boil and peel the eggs, slit them without cutting to edge and set aside.
3. Heat little oil/ghee in wok and fry the thinly sliced onions till turns golden brown. Drain and set aside.Then add oil in a wok. Add the spices to it and fry for few seconds.
4. Then add onion and ginger garlic paste and cook till it turns translucent. Add spice powders and mix well for a minute till raw smell goes.
5. Add tomato and cook till it is soft and mushy. Add peas and cook covered till it is soft.
6. Cook on low heat. Add a few tbsp of water if really needed.Add salt and mix well.
7. Now add the eggs and  give it a good mix along with a tbsp of coriander leaves.Turn off the heat.


To assemble:
1. Take a pressure cooker and add half of the masala at the bottom. Layer this with rice and add remaining masala and another layer of rice.
2.  Drizzle little ghee on top and close the lid. Cook on low heat with whistle on for 15 to 20 mins. See that it doesn't whistle.
3. Turn off heat and wait till the pressure goes for about 10 mins. Then open the cooker and transfer the biryani to a bowl. Add the remaining coriander leaf, fried onion and serve warm with a squeeze of lemon juice.


Notes:
1. Cook rice in the way you are comfortable with. The rice should be 3/4th cooked and have stand alone grains
2. Instead of cooking the biryani in pressure cooker you can cook it in oven too. In that case preheat the oven to 350F. Grease a baking dish. Layer half the masala and then half the rice. Add another layer masala and then rice. Add the fried onion on top and drizzle ghee on top.Cover and cook for 25 to 30 mins.
3. You can use green bean,carrots or a mix as veggie here.or use no veggie at all too.
4. If using dried variety of peas soak and cook earlier. Then add to the masala and continue cooking.
5. Add salt accordingly.


ShareThisFinal

LinkWithin

Related Posts Plugin for WordPress, Blogger...