Thursday, September 27, 2012

Egg with garlic chives

Had brought a bunch of garlic chives during last visit to farmers market...The plan of buying was to click...But got hooked with many other things that I totally forgot about it. That lost its beauty being hidden in my refrigerator...Anyways cooked it up with egg to make a delicious side...


Eggs-3 nos
Onion-1/2 of big one(chopped to small pieces)
Tomato-1 small(finely chopped)
Green chili-1 no
Turmeric powder-1/4 tsp
Spring onion(green part)-2 tbsp(chopped)
Salt to taste
Garlic chives-3 tbsp(chopped)
Pepper powder-1 tsp(finely crushed)
Oil- 2 tsp


Method of Preparation:
1. Heat oil in a pan. Add the chopped onions and fry till it turns translucent.
2. Add the green chilies,turmeric and mix well, then add tomatoes. Cook for few minutes till it turns soft.
3. Add the garlic chives to this and mix well.Cook for a minute.
4. Add the required amount of salt.
5. Now reduce heat to low and break the eggs into it. Mix it well with all the other ingredients till it gets cooked.
6. Add the pepper powder and mix well. Don't heat the egg once it sets. If overcooked  egg turns out dry.Serve warm with rice/flat breads.


Wednesday, September 26, 2012

Photography Exercise: Adding Life to Photographs

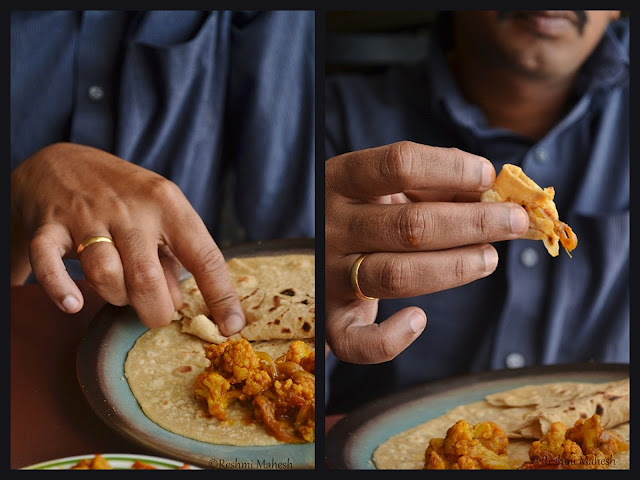
This time the photography exercise by Aparna is to add life to your photo...ie adding the presence of a human in the picture...This exercise was very tough for me...Firstly my models where too tough...One would not pose(2 year son) and the other one was acting too much(read as hus)...I had almost left the plan of participating...But after a lot of pleading hus was ready to pose and now I was not at all able to click properly...Either the angle or the pose or the food or nothing was proper...I really felt that I am worst at this work...There were many clicks taken but nothing was good to be shown to anyone. Then two days back I was photographing the food that I had prepared for lunch...My husband has the habit of irritating me by picking and eating the stuffs that I set for photo shoot...This time when he did that it happened to be in my favor.. I clicked few...and then I asked him to pose for more clicks(considering that if nothing is there then this would work.).. Anyways feel that these are just ok..Not really sure if composition wise these are good...Do let me know with your valuable comments....

Clicked when hus came home for lunch....Now I noticed that the colors are complimenting...:)
Nikon D3100. 18-55| Manual|  f/5.6| 1/60 S| ISO-400.
Nikon D3100. 18-55|  Manual| f/5.6| 1/40 S| ISO-400.

Nikon D3100. 18-55|  Manual | f/5.6| 1/40 S| ISO-400.
A Planned Shot...:)

I had this plan of clicking my son with a sucked lollipop(He just messes it up such that his whole body would be sticking with lollipop) as one of the pics...and also knew that it was impossible as my son comes running to the camera instead of posing...so had almost  dropped the idea. One afternoon while I was clicking something he woke up from sleep and came running to me(basically to grab the stuffs..) In order to divert his attention from the table I handed him a lollipop. I just stopped clicking and was moving my stuffs back to place when my son  was sitting on that table and watching TV. Now there was a chance for me to click...The light is not so good..but still I liked the click as it is something I wanted to try...This is the first image that I had thought when the theme was given...

Nikon D3100. 18-55| Manual|  f/5.6| 1/50 S| ISO-400.
Here focus is on the lollipop...the glow on lollipop making it look like just sucked...

The next capture was taken on sunday...I had baked a cake on friday...Had shot some of the clicks of that and then asked my hus to pose with that..the clicks were pathetic....I just deleted the whole bunch...In between all these shots my son was taking the cake slices and enjoying the whole thing...After posing for me hus went to him and asked him to share his slice(playfully). My son readily did that...(cute right?) which I clicked...Hey he took the slice from dads hand the next minute(when he realized whats happening...:))

Nikon D3100. 18-55| Manual|  f/5.6| 1/60 S| ISO-400.
An unexpected shot....no pose, no set up...BG was a bit cluttered...Little post processed to reduce the bg clutter.


Monday, September 24, 2012

Quinoa Cutlet

Quinoa that was being set to make a Salad turned  to a cutlet....Shallow fried with minimum spices and loads of colorful veggies...and yes very delicious....You will definitely love it...
Before running to prepare this here is some things on how it is... This recipe is purely a mixture(all things I could grab and feel at that moment) of this and that...First of all dont think about the Indian cutlets with loads of spices...Here it is minimum...No cooked softened veggies...You get a crunch from the half cooked stuffs here...to all this adds the nutty texture of quinoa...Potatoes give it a mild smooth feel and the mild heat by the green chilies...Hmmm...No not crispy as deep fried with a coating but still has a crispy feel to it... Altogether we enjoyed everything about it...


Quinoa-1/2 cup(cooked)
Beetroot-1/3 cup(grated)
Carrot-1/3 cup(grated)
Potato-1 (medium sized,boiled)
Coriander seeds-1 tbsp(crushed)
Pepper corns-1 tbsp(crushed)
Fennel seeds-1/4 tsp(fry in oil)
Green chili-1(chopped finely)
Lemon juice-1 to 2 tsp
salt to taste
onion-1/4 piece
oil-1 tsp
Oil for shallow frying.


Method of Preparation:
1. Cook quinoa with little salt and once done drain the water and set aside.Fluff the grains and if you feel it sticks keep in the refrigerator for some time. It works well.
2. Boil the potato, mash it and set aside.
3. Coarsely crush the coriander,pepper corns and set aside.
4. Heat oil in a wok and add the fennel seeds, mix for few seconds and then add the onion to it.
5. Cook for few minutes till translucent then add carrots, beets and green chilies and cook covered for few minutes  till it becomes slightly soft.then open and cook it till it becomes dry.Turn off the heat.
6. When mixture turns warm add it to the mashed potatoes, crushed spices, salt and lemon juice ..Mix well with hands/spoon.
7. Heat a tsp of oil on a griddle.Take a lemon sized ball of the mix and flatten it slightly on ur palm.
8.  Place it on the hot oil and cook it till that side turns light brown. Turn it with the help of two spoons and cook other side too. Add more oil(1 tsp at a time) if required.Cook 2 or 3 patties at a time according to the griddle size.
9. Serve warm.


Notes:
1. Don't cook the veggies for long time. The veggies used here can be eaten raw too..so just cook for few minutes.
2. As quinoa is added it has a nutty texture and taste.
3. While shallow frying be careful while turning it.Need to be really soft while doing it.
4. There should not be water in it. If  the dough looks too soft add little bread crumbs to thicken it.
5.Cooking Quinoa:  Cook quinoa with required water and pinch of salt for 15 min or until you see a thread like stuff from the quinoa. Then drain the remaining water and keep aside to cool. Or you can cook quinoa(the above given amount) with just 1 cup water till the water is completely evaporated and quinoa is cooked.
6. This can be eaten with a sprinkle of chat masala and chopped onions...Perfect Indian style and it taste wonderful that way.


Saturday, September 22, 2012

Chaat style Potato

Potato is one of the veggie that is liked by most...Every one enjoys eating it..and its a very flexible veggie...You can make it in any form and it never tastes terrible...whatever spices may be used or what ever cooking technique is used..
It is one of the fave veggies of my son too...I try cooking it in many forms and this is one among them..


Potatoes-2 nos
Coriander seeds-1 tsp
Cumin-1/4 tsp
Mustard seeds-1/2 tsp
Onion-1/4 (finely chopped)
Turmeric-1/4 tsp
Chili powder-1/4 tsp
Oil-1 tsp
Onion greens-1 (finely sliced)
Lemon juice-1tsp
Cilantro-2 tsp(chopped)
Dried red chili flakes-to sprinkle
Salt and black pepper to taste


Method of Preparation:
1. Wash and peel the skin of potatoes and cut them to small(1/2 inch) cubes. Boil them in water until it is cooked but firm when fork is inserted.Set aside
2. Using a motar and pestle, coarsely crush the coriander seeds. Heat oil in a pan on medium heat. Add the mustard seeds, cumin and crushed coriander seeds. Fry till mustard pops.
3. Add the onion and fry it till golden on low heat.Add turmeric and chili powder and stir to combine. Add salt and pepper to it.
4. Add the potato cubes and fry for few minutes for flavors to combine. Turn off the heat and add the lemon juice, onion greens and cilantro. Add more salt if needed. Sprinkle the chili flakes for heat.Serve warm as a tea time chaat or as side for rice or rotis.


Thursday, September 20, 2012

Cilantro-Lime Rice

A quick and delicious rice...Goes perfect with a spicy side..


Rice-1 cup(cooked)
Salt to taste
Olive Oil-1 tbsp
Green chilies-1 no
Cilantro- 2 tbsp (chopped)
Lime/Lemon Juice-1 to 2 tbsp(freshly squeezed)


Method of Preparation:
1.You can either use pre cooked rice or you can cook the rice with 1:2(rice:water ratio).I like adding salt while cooking the rice. After cooking let the rice come to room temperature.
2. Heat olive oil in a pan and fry the green chilies for few seconds.Turn off the heat and add this hot oil to the rice.
3. Here if you have not added salt while cooking rice add the required amount of salt. Mix this and add the lemon juice and cilantro and mix well.
4. Serve warm with spicy side of your choice.


Notes:
1. Adding green chili is just for the heat. You can omit that. You can also add rice to the oil and mix well for few seconds. Then remove from heat, and mix the cilantro and lemon juice.
2. Do not mix lemon juice while very hot as it yields a bitter taste.


Monday, September 17, 2012

Chivda using Rice Krispies

A simple snack recipe that can be changed as you wish....There is no such rules here...You put in anything...mix and eat..Chivda is a snack made of pori(puffed rice), Aval(beaten rice) or even you can use Rice crispies...Any nuts can be used.If you need a hot version increase the spices... you want it garlicky add crushed garlic fried lightly in oil..These stay fresh for long when kept in air tight box...and makes a perfect snack for tea...and is very easy to put together...Eat them as is or garnish with little chopped onions and a squeeze of lemon juice...Just perfect...


Rice krispies -4 cups
Peanut-1/4 cup
Cashews-1/4 cup
Raisins-1/4 cup
Roasted gram(Pottu kadala(i))-1/4 cup
Curry Leaves-1 sprig
Red chili powder-1/2 tsp
Turmeric powder-1/4 tsp
Sugar-1/2 tbsp
Dry Red Chili-1 no(halved)
Salt to taste
Oil-3 tsp


Method of preparation:
1. Heat 1 tsp oil in a wok. Fry the peanuts till the color of skin changes slightly. It should be crunchy too. Drain and set aside.
2. Heat remaining oil and fry the cashews, raisins and set aside. Then fry the roasted gram and keep aside.
3. Now fry the curry leaves and the dry chili in remaining oil.Add more oil if needed.
4. Now add the red chili powder, turmeric powder and rice krispes in the warm wok(heat turned off) and give it a good stir(there should not be oil in it,oil traces are fine).
5.  Add this and all other drained ingredients into a medium sized vessel.
6. Give it a good stir and then add the sugar and salt to it.
7. Put a lid to the vessel and give it a good shake, so that all the ingredients mix well. Cool and store in air tight vessel.
8. Serve as a snack with tea/juice.


Friday, September 14, 2012

Cornflake cookies

This time Baking Patners group decided to go with the theme cookies. There where three cookies from which we had to bake one or can bake all. All the three cookies were too good, but due to time constraints with a kid and some guests around I opted to go with one. So I selected Cornflake cookies suggested by Priya from a cookbook called "Baking: Commonsense Guide by Murdoch  Books". Thanks for that recipe..The cookies were awesome, crispy outside and soft inside ..Do give it a try..


Softened unsalted butter-125gms/10tbsp
Sugar-3/4 cup/165gms
Eggs-2nos (lightly beaten)
Vanilla extract-1tsp
Black raisins-2tbsp
Dessicated coconut-1+1/2 cups/135grams
Baking soda-1/2tsp
Baking Powder-1/2tsp
All purpose flour-2 cups/250grams
Crushed Cornflakes-2 cups

Method of Preparation:
1. Preheat the oven to 350F, line two baking trays with baking paper.Sieve the flour with baking soda and baking powder.
2. Cream the butter and sugar in a bowl, using electric beaters until they turn light and fluffy.
3. Gradually add the egg, beating thoroughly after each addition then add the vanilla and beat until combined.
4. Now add the raisins,coconut, give a stir. Fold the flour mixture with a metal spoon and stir until the mixture is almost smooth.
5. Put the crushed cornflakes in a shallow dish, then drop tablespoon of this cookie mixture onto the cornflakes and roll into balls.
6. Arrange on the trays, bake for 15 to 20 minutes or until they turn golden.
7. Cool completely and arrange in an air tight box.


Notes:
1. I prepared half the quantity and got around 15 cookies.
2. Used vanilla flavored corn flakes for coating.
3. Reduced coconut little(Used about 1/2 cup) for half the measurement.


Done By:

Tuesday, September 11, 2012

Mushroom Manchurian- My take on it..


Mushroom-3 nos(stuffing mushrooms)
Shallots-2 nos
Ginger- a small piece
Garlic-1 medium sized clove
Coriander seeds-1 tsp
Cumin-1/4 tsp
Green chili-1 no
All purpose flour- 3 tbsp
Corn flour-1 tbsp
Red chili powder-1/4 tsp(add more for heat)
Water- 2 to 3 tbsp
Salt to taste


For Dry Gravy:
Onion-1/2 of small one, cut to big cubes
Bell pepper/ Capsicum- 1/4 cut to big cubes
Soya sauce-1 tsp
Tomato sauce-1 tsp
Garlic-1 clove(minced)
olive oil-1 tsp


Method of Preparation:
1. Crush the ginger, garlic, coriander,Green chili, cumin coarsely.
2. Wash and cut the mushrooms each to 6 pieces.
3. Slice the shallots finely, add this and crushed mixture to the mushrooms along with APF and corn flour, salt and chili powder.
4. Mix well with little water. The batter should coat the mushrooms.
5. Drop each piece separately using a spoon into hot oil. Fry little at a time to golden brown, drain on paper towel and set aside.

For Dry Gravy:
1. Fry garlic till it loses it raw taste.
2. Add onion and cook till it is slightly soft.Then the peppers till it is cooked but has a crunch.
3. Add the sauces on high and mix well for a few seconds. Add a tbsp of water to this.
4. Then add the fried mushrooms and heat on high.Turn heat off. Garnish with coriander leaves(if using).
5. Serve warm as side to variety rice.

Notes:
1. While making batter for the mushrooms add water little at a time. The batter should be coated evenly on mushroom.If more water is added batter(too thin) won't coat mushroom and if less water is added batter(too thick) will form lumps around mushroom.
2. Heat oil on medium heat and strat dropping battered mushrooms only when oil is hot and then fry slowly on medium low heat.
3. Add salt accordingly as sauces has salt in it.
4. Do not crowd while frying. Add little at a time.
5. My gravy was very less, just a little moisture added to fried ones. There was no liquid at all in this method.
6. If using button mushrooms cut each one to four pieces.


ShareThisFinal

LinkWithin

Related Posts Plugin for WordPress, Blogger...