Showing posts with label Baking Partners. Show all posts

Monday, April 15, 2013

Mango CheeseCake

With dark fluffy clouds, fierce winds and occasional snows my part of world is still in the clutches of winter...Everyday sun tries to make an effort to shine high and bright but immediately it is attacked by cold and dark clouds that it goes unnoticed. With all these dull stuffs happening here I was eager to bring in some sunshine to the hearts of my loved ones. It was at that time Baking partners group decided to bake cheesecake and this bright and summery cheesecake was in there. Immediately seeing mango I fell for them and decided to go for it. It was all perfect, delicious and an eye catchy stuff  and very easy to put together with no baking included. This recipe was suggested by Sweatha adapted from Divine Taste. Now lets move on to the recipe...


For Crust:
Digestive biscuits/any plain sweet biscuits-11/2 cups(160 gms, crushed)
Butter-1/2 cup(100 gms, chopped)

For Filling:
Fine sugar/powdered sugar-1 cup(160gms, add more if needed)
Thick full fat yogurt-3 cups(800gms)
Paneer Cheese-2 cups(400gms)
Water-11/2 cups(375ml)
Agar Agar/china grass-15 gms
Mangoes-2 nos/1 cup(peeled, chopped, pureed)
Pure Vanilla Extract-1 tsp

For Mango Glaze:
Mango-1 nos/1/2 cup(peeled, chopped, pureed)
Water-2 tbsp
Sugar-2 tbsp
Lime Juice-1 tbsp

Method of preparation:
Preparing thick yogurt:
1. Place the yogurt in a cheesecloth and let drain to a colander overnight. The quantity will reduce to half (400 gms or 11/2 cup)next day.

Preparing Crust:
1. Place the biscuits in a zip lock bag and crush it to powder using a rolling pin.
2. Add this powder and the cubed butter into the food processor and process till the mixture is well mixed.
3. Remove the mixture and press it on to a 8"/9" springform pan.
4. Chill in freezer for 15 minutes or in refrigerator for half an hour.

Prepare Filling:
1. Break and soak the  china grass in 11/2 cup water for 10 minutes until it becomes soft.
2. In a food processor blend the paneer and thick yogurt to smooth and  creamy mixture. Transfer to a bowl.
3. Heat mango puree in a saucepan over medium heat. Do not allow it to boil.
4. In another pan, place the china grass and water mixture and stir on low heat until it melts completely, about 5 to 6 minutes. Do not allow this to boil.
5. Once the china grass melts completely, pour the hot china grass mixture into hot mango puree, stirring all the while.
6. Slowly add mango mixture into yogurt and cheese mixture, stir in the sugar and vanilla extract and beat well with a wire whisk until well blended.
7. Pour this mixture over the prepared crust, level with a spoon and chill in refrigerator for 3 to 4 hours.


For mango glaze:
1. Place all ingredients for glaze in a pan and  cook over medium heat.
2. When it begins to boil, reduce heat and cook for 3 to 4 minutes more. Let it cool to room temperature.
3. Spread it on cheesecake with spoon.
4. Allow the glaze to set over the cheesecake for 2 to 3 hours or more before slicing it.


Notes:
1. You can use cottage cheese instead of paneer. In that case let the water drain completely before using. The cheese should be dry to get a perfectly set cheesecake.
2. Blend the paneer to puree here.
3. China grass should be completely melted to set properly. Do it on low heat.
4. Break the strands of china grass to small pieces  before soaking it.
5. While mixing the china grass mixture let both the liquids used to mix be hot, so that it sets properly.
6. If china grass sets before u mix to another mixture, then reheat till it melts completely.
7. The sugar mentioned here is just sweet. If you have a sweet tooth then add about 1/4 to half cup more. Applies if your mangoes are sour too. Taste the mixture to check it before setting.
8. You can use the mixer to powder the biscuits too.
9. You can make the cheesecake as individual servings too.
10. I have used graham crackers for the base.
11. I  used 9" springform pan.


Friday, March 15, 2013

White Bread using Tangzhong Method

Baking a bread and then enjoying the fruit of your work is the best thing to do..And if the bread turns super soft and delicious then you can sing along about it..:) This time Baking Partners group came up with baking bread using either Asian method-Tangzhong or the Scandinavian method. I went with the Tangzhong method where in one part of flour is heated to 65C with five part of water. This method yields soft breads. The recipe is from Christine's Recipe   and thanks Swathi for suggesting it. The bread was super soft and had great texture..Here is how its done..


Ingredients for tangzhong: 
Bread Flour-1/3 cup/50 gms
Water-1/2 cup
Milk-1/2 cup

Ingredients for bread:
Bread flour-21/2 cups/350gms
Caster Sugar-3 tbsp+2 tsp/55 gms
Salt-1 tsp/5gm
Egg-1 large/56gm
Milk powder-1 tbsp+ 1 tsp/7 gm(optional)
Milk-1/2 cup/125ml
Tangzhong-120 gm
Instant Yeast- 2 tsp/5 to 6 gm
Butter-3 tbsp/30gm(softened)

Method of Preparation:
1. Mix flour n water well without any lumps. Cook over medium low heat, stirring constantly  to avoid burning or sticking. The mixture starts to become thick.
2. Once you see some lines appear in mixture when you stir with spoon remove from heat. The temperature of mixture will be 65c/149F.
3. Transfer it to a clean bowl and wrap with a cling film to avoid drying. Once cooled completely this can be used to make bread. You can use it the same day or the next day.


Method of making bread:
1. Combine all dry ingredients in a bowl make  a well in center and set aside.
2. whisk egg, milk, tangzhong together and add this into the dry ingredients. Knead until everything comes together and you get a dough shape and gluten has developed. Then knead the butter.
3. Knead the dough into a ball shape and keep it in a  greased bowl covered with a kitchen towel to proof till its doubled in size, about 40 minutes or more depending on the weather.
4. Transfer it to a clean  floured surface. Deflate and divide the dough into four equal portions. Knead into small balls, wrap in cling film and let rest for 15 minutes. Meanwhile grease a 9"X 5" loaf pan. Preheat the oven to 350F.
5. Take a small ball and roll it to a small oval shape using a rolling pin. Fold the smaller side into center and then the other side slightly over the earlier one.
6. Now roll again to form a small rectangle and then make it to a roll. Keep the roll in the baking pan and continue with the other dough ball.
7. Set it aside covered with a kitchen towel to proof  for 40 minutes or till it reaches to 3/4th of the tin.
8. Apply a layer of egg wash to the dough and bake it in the preheated oven for  35 to 40 minutes. To check doneness tap the bread and you should hear a hollow sound.
9. Transfer to wire rack to cool completely. Slice and enjoy soft freshly baked bread. You can keep it in airtight box for later use.


Turned them to a simple sandwich.....
Notes:
1. Tangzhong can be kept fr a day or two in fridge. Do not use it if you see it has turned dark. Top be on safer side use it on the day its made or the next day.
2. You can make this bread into rolls, shape it, fill it.
3. Instead of bread flour you can use all purpose flour.
4. For the half milk half water used in making tangzhong you can use full 1 cup water.
5. Instead of egg wash you can use milk or cream to get brown color, but gloss will not be there.
6. While baking if the top of your bread is browning fast then cover it with a foil.
7. The rise time of dough depends on the area you live.
8. The dough is very sticky.Its a mess when you knead with hand. You have to knead till it is soft and elastic and do not add extra dough. Kneading properly should help to get rid of stickiness.


For shaping the bread check this link.

Friday, February 15, 2013

French Macarons- Baking Partner challenge #7

This time  Baking Partners group came up with cute but devilish recipe..yes..MACARONS. The recipe was suggested by Swathi and Vidhya from Martha Stewart. These are such cute and delicious treats that seeing them and the ingredients you definitely will want to try them. They are easy to get hold on  but it requires lot of patience, perfection and homework to achieve that.I went with the basic recipe and the things I did are written in notes and have kept a few links too.Felt great baking them and getting it right. A note of thanks to the lovely ladies in this group. Feels great to work together and this time it was more evident that we are awesome together.. :)
So here are my attempts...Need to perfect a lot..


Icing sugar/Confectioners' sugar-3/4 cup
Almond flour-3/4 cup
Egg whites- 2 large at  room temperature(aged)
Cream of tartar- Pinch
Superfine sugar-1 tablespoon + 1 teaspoon


1.  Pulse confectioners' sugar and almond flour in a food processor until combined. Sift mixture twice/thrice.
2.  Preheat oven to 375 degrees. Whisk whites with a mixer on medium speed until foamy.
3.  Add cream of tartar, and whisk until soft peaks form. Reduce speed to low, and then add superfine sugar. Increase speed to high, and whisk until stiff peaks form, about 8 minutes.
4.  Sift flour mixture over whites, and fold until mixture is smooth and shiny.
5.  Transfer batter to a pastry bag fitted with a 1/2-inch plain round tip, and pipe 3/4-inch rounds 1 inch apart on parchment-lined baking sheets, dragging pastry tip to the side of rounds rather than forming peaks. 6. Tap bottom of each sheet on work surface to release trapped air. Let stand at room temperature for 15 minutes.
7. Reduce oven temperature to 325 degrees. Bake 1 sheet at a time, rotating halfway through, until macarons are crisp and firm, about 10 minutes.
8. After each batch, increase oven temperature to 375 degrees, heat for 5 minutes, then reduce to 325 degrees.
9.  Let macarons cool on sheets for 2 to 3 minutes, and then transfer to a wire rack. (If macarons stick, spray water underneath parchment on hot sheet. The steam will help release macarons.)
10. Sandwich 2 same-size macarons with 1 teaspoon filling. Serve immediately, or stack between layers of parchment, wrap in plastic, and freeze for up to 3 months.


Chocolate Ganache
Bitter sweet chocolate-8oz
Heavy whipping Cream-3/4 cup

Method of Preparation:
1. Chop the chocolate to small pieces and keep aside in a bowl.
2. Heat cream in a pan on medium heat and when it starts to boil turn off the heat.
3. Pour the hot cream on chocolate and keep for 2 minutes without stirring.
4. Then mix until smooth and set aside to cool and thicken for some time. Once thick to the consistency you need it add to a piping bag with round nozzle and squeeze little to center of nacaron. Then press the other one on top and twist it to spread the ganache.

Notes:
1. Making Almond Flour:
         I used blanched almonds. Powdered them along with the little icing sugar to fine powder without releasing oil. If you feel that the almonds stick to the wall just tap on outside of mixer and if the powder falls back its fine, but if it starts to stick then oil is generated. In that case stop grinding and dry the flour.
2. Now sieve the flour to get fine powder. Mix remaining sugar to it and sieve again for 3 times. If any big particles are there then powder it again and if they cant be powdered future discard them.
3. I kept the egg whites separated for 11/2 days outside closed with a kitchen tissue. You can keep it up to 5 days in refrigerator. To beat the whites use a clean oil and dirt free vessel.
4. Have used an extra baking sheet to slow the process of having feet and dome due to high heat at the bottom.
5. Tap the tray and any air bubbles not broken is poked with a toothpick. Any air bubbles left will lead to cracks.
6. The temperature for baking perfect macarons depends on your oven settings. It need notbe the same as I have mentioned here. The above temperatures were perfect for my oven.
7. Macarons  can be filled with buttercream, ganache, jam, lemon curd. Once filled they taste great after 24 hours of resting in fridge.
8. There are a lot of videos and sites I have checked. some of them are:
 http://www.ironwhisk.com/2012/05/french-macarons/
 http://foodnouveau.com/2010/03/destinations/europe/france/how-to-make-macarons-a-detailed-illustrated-step-by-step-recipe/
 http://daydreamerdesserts.com/2010/11/demystifying-french-macarons.html/
 http://www.syrupandtang.com/201003/of-ovens-and-baking-and-macarons/
 http://www.youtube.com/watch?v=yDo0SgDKLVw
 http://notsohumblepie.blogspot.com/2010/08/macaron-troubleshooting-new-recipe.html


Tuesday, January 15, 2013

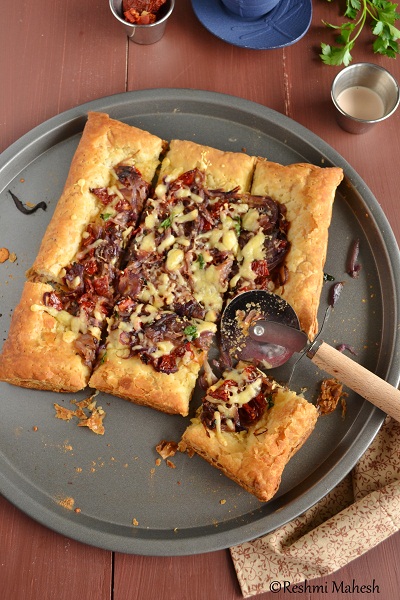
Sun Dried Tomato and Onion Tart-Baking Partners

This time we the Baking Partners decided to bake pies. As always I was waiting for the beautiful day to bake one that the flu visited us through my son..Poor baby he was very badly hit by it and the flu has caught all of us with severe headache, fever and cough ..With all this around I was not in a position to bake and enjoy anything..When I could finally get some relief yesterday decided to bake this tart..There is another reason too..when I had decided to join this group my main idea was to bake things other than cakes and breads..so this time I wanted to do it..I went with this easy tart suggested by Samantha of Samantha Menzies from here. It was very easy to put together and required very less effort and was equally delicious.


 Thawed puff pastry sheets-2 nos (9 by 9 inches)
Olive oil-2 tbsp
Onions-3 cups (thinly sliced)
Thyme- 4-6 sprigs
Salt to taste
Dijon mustard-1½ tablespoons
Heavy cream-1½ tablespoons
Gruyere-1 cup grated
Sun-dried tomatoes- ½ cup (roughly chopped)


Method of Preparation:
1. Preheat oven to 400 degrees.
2. Place sheets of puff pastry on a baking tray. Prick surface with a fork, leaving a ½-inch border untouched. Bake until  lightly browned, about 10 minutes. Transfer to a rack to cool.
3. Meanwhile, prepare onions. Set a  pan over medium heat. Heat oil and add onions, thyme and a pinch of salt. Cook, stirring occasionally, until onions turn golden, about 15 minutes. Season with salt.
4. In a small bowl, mix mustard with cream. Once pastry is slightly cool, return it to baking tray and spread mustard-cream sauce over top, leaving ½-inch border untouched.
5. Scatter half of cheese over sauce and top with onions. Add remaining cheese and tomatoes over top.
6. Return trays to oven and bake until cheese melts and browns in spots, about 15 minutes.


Notes:
1. Even after pricking the puff sheets they puff up while baking so do prick them after taking out.
2. I replaced thyme with dried Oregano & fresh parsley leaves
3. Instead of Gruyere I used Emmental Swiss Cheese.
4. I halved the recipe.


Friday, December 14, 2012

Plum Cake/Fruit Cake

This time Baking Parteners group started by Swathi had three wonderful cakes suggested by Suja and Archana. Before the mail for this months challenge had come I had decided to bake a fruit cake for this X'mas. Once the challenge came and I saw the recipes I wanted to try Brazil nut cake as well as the earlier decided fruit cake..but due to the lack of people to eat I opted to go with just one. I went with the fruit cake which was so perfect for the season. The cake was suggested by Archana and it came out good though there were some issues that I faced which I have mentioned in the notes section. Anyways the cake got over before X'mas...:(. I felt that the cake was getting better as days went.
As for the recipe I had tweaked it little according to our needs. Instead of rum, I have used orange juice. You can use apple juice too.


Fruits Used:
Raisins- 1 cup
Dates-1 cup(chopped)
Candied Orange/Lemon Peel- 1/4 cup, sliced thin
Orange Juice- 1/4 cup
Unsalted Cashew Pieces- 1 cup
All Purpose Flour-1 tsp( to mix with fruits)

Spices Used:
Cinnamon Powder- 1/2 tsp
Caraway seeds- 1 tsp
Ginger Powder- 1/4 tsp
Clove Powder- 1/4 tsp
Nutmeg Powder- 1/4 tsp

For Caramel:
Sugar- 6 tbsp
Water- 3 tbsp
Lemon Juice- few drops
Boiling Water-1/2 cup

For Cake Batter:
All-Purpose Flour- 2 cups
Baking Powder -1 tsp
Unsalted Butter- 2 sticks (8 oz) at room temperature
Powdered Sugar-2 1/2 cups
Eggs- 3 large or 4 medium (separated)
Vanilla Extract-1 tsp
Rum extract-1 tsp


Method of Preparation:
For the Fruts:
1. Soak the fruits and nuts in orange juice in a clean bowl and set aside. Keep it on counter top for a day closed properly with an air tight lid. Then move it to refrigerator and keep it there for 2 days. Before baking take the fruit mixture from fridge and set on counter top.
2. Heat a pan and add the soaked fruits into it and warm it slightly and set aside to cool.Once cold and juts before mixing with batter add a tsp of all purpose flour to the dry fruits and give it good mix. Helps to prevent the fruits form sinking to bottom.

For Caramel:
3. In a small pot, add 6 Tbsp Sugar and 3 Tbsp water and few drops of lemon juice. Swirl pan to mix – do not use spoon.
4. Heat until sugar changes color and becomes caramelized. (approx 7-8 minutes).See that you don't burn it.
5. Add 1/2 cup boiling water and swirl pan again to mix well. Keep aside.

For Cake Batter:
6. In a large mixing bowl, combine softened butter and powdered sugar and beat with hand blender.
7. Add one egg yolk at a time to the mix and blend well.
8. Add Vanilla, rum Extract and blend.
9. Combine all dry spices, baking powder and flour and sift it into the bowl, adding little at a time and blending.
10. Preheat oven to 325 degrees Fahrenheit.
11. Lightly coat 9"/10" baking pans by spraying cooking oil or regular oil.
12. Add caramelized sugar syrup a little at a time into mixing bowl and blend.
13. Add fruit/nut mixture, caraway seeds into mixing bowl and mix with a spoon.
14. In a separate bowl, beat egg whites until they are fluffy and soft peaks form.
15. Fold beaten egg whites into the cake batter.
16. Pour batter into greased baking pans and bake for approx 1 hour  30 mins at 325 degrees F. For smaller pans, baking time may vary.
17. Remove cake from oven and allow it to cool for few minutes in pan and then on rack till it is completely cooled.


Notes:
1. The original recipe used rum which I replaced with orange juice of same amount. 
2. Since rum is not used to mask the egg smell in case it existed I used rum extract. 
3. Caraway seeds are added extra by me. Its optional.
4. To reduce the baking time increase the oven temp to 350 F and bake in middle rack. If top gets cooked earlier use a foil to cover it to avoid blackening of the top.
5. Mixing the dry fruits with all purpose flour prevents it from settling at the bottom.
6. Be careful while making caramel syrup. It tends to burn easily. So keep an eye on it.
7.  I used a 9" spring foam pan lined with parchment paper.
8. Cake got delicious as the days went by.
9. Do increase the amount of sugar used to make caramel to get a darker color for cake. In this case reduce the amount of powdered sugar.You can replace half of the sugar with dark brown sugar too.
10. When I baked at 325 F the outer side of cake cooked faster and the center took long time to cook. But still the center cooks perfect without burning the outer.Just that the time is more.


Thursday, November 15, 2012

Shaped Dinner Rolls

Baking Partners 4th challenge was shaped dinner rolls. Swathi suggested two recipes using which the rolls can be made and there where about 7 shapes from which we need to do any 3. She had given every necessary details for shapes with respective videos.
Now on to my struggle with these rolls...As of it the videos were very helpful and clear. I felt that it was easy to shape..but then while shaping other than clover leaf everything else was a bit tough for me...Shaping was not tough..getting the end product in same shape was. Shaped goods looked good once they doubled but after baking somehow they were terrible..I need to learn by practicing to perfect it. As for the recipe I tried baking the one using egg the Lion House Rolls recipe. The rolls where soft and delicious and was texture wise superb compared to eggless ones that I have baked till now.


All purpose flour-5-5 1/2 cups(bread flour can be used)
Warm water-2 cups (110-115 degrees)
Nonfat dry milk-2/3 cup(instant)
Dry yeast-2 tbsp
Sugar-1/4 cup
Salt-2 tsp
Shortening (butter or margarine)-1/3 cup
Egg-1


Method of Preparation:
1. In the large bowl of an electric mixer, combine the water and the milk powder and stir so the milk powder dissolves.
2. Add the yeast to this mixture then the sugar, salt, shortening, egg and 2 cups of the flour.
3.  Mix on low speed of mixer until ingredients are wet, then turn to medium speed and mix for 2 minutes.
4. Stop the mixer and add 2 more cups of flour then mix on low speed until the ingredients are wet, then turn mixer on medium speed and mix for 2 minutes.
5. The dough will be getting stiff and you may need to remove the bowl from the mixer and mix in the remaining flour by hand.
6.  Add approximately 1/2 cup of flour and mix again. (This can be done by hand or mixer). The dough should be soft, not overly sticky, and not stiff. (It is not necessary to use the entire amount of flour).
7.  Scrape the dough off the sides of the bowl and pour approximately one tablespoon of vegetable oil all around the sides of the bowl. Turn the dough over in the bowl so it is covered with the oil. (This helps prevent the dough from drying out.)
8. Cover with plastic and allow to rise in a warm place until double in size.
9. Sprinkle a cutting board or counter with flour and put the dough on the flour.
10. It is now ready to roll out and cut into desired shape and size of rolls.
11. Place on greased (or parchment lined) baking pans. Let rise in a warm place until the rolls are double in size (approx. 1-1 1/2 hours).
12.  Bake in a 375-degree oven for 15-20 minutes or until they are browned to your satisfaction. Brush with melted butter while hot. Yields 2 to 2 1/2 dozen rolls.

To shape the rolls:
1. Braid:


1. Roll the dough in rectangle form.
2. Cut it to half length wise.Cut to strips of the size of two fingers vertically.
3. Cut each strip to 3, not going all the way top. Now take the strips and braid.
4. Pinch the ends together and turn them down.Set on the tray and let them double in size and off to bake.

2. Clover leaf:


1. Pat the dough about an inch thick.
2. Using a medicine bottle make small balls by pressing bottle against dough.
3. Take  three such balls and drop them in a muffin cup.Let them rise for about 1 to 11/2 hour and then bake.

3. Rose:


1. Use a big glass and cut cut the dough into round form.
2. Apply butter on the inner side. Take two such rounds and make smiley face by pressing it to half.
3. Now hold one end of both smiley face and join then. do the same with the other end. Put them in baking tray. Let double and then bake.

The video for above three rolls is here

4. Knot:


1. Take a small ball sized dough and shape to a 9-inch rope.
2. Roll it and then roll the two side to make it thin,resulting in a  fat thick center and slightly tapering/thin ends.
3. Lay it over your finger and wrap the roll around the finger to form a loop and push one end  up through the middle and tuck the second tail underneath.
4. Place roll on a prepared pan . Let it double and then bake.


The video for knot rolls is here

Notes:
1. Use egg wash to get that brown color.
2. Dab butter immediately once taken from oven.
3. Wrap in a clean kitchen cloth and keep in a box if not using immediately.


Monday, October 15, 2012

Pumpkin Chocolate Chip Muffins

         This time we Baking Partners group decided to bake muffins or cupcakes using pumpkin. Mainly because of fall and Halloween which is in 2 weeks...There where three recipes from which we can do one or all three...I again opted for one recipe...There where many reasons behind it...First one being that this is the first time I am baking something with pumpkin...as of the relation between me and pumpkin...we are neither friends nor enemies...Got it..right!!! I mean I neither like it nor  hate it...But baking with it was something I was reluctant to...I had seen many recipes around and have always thought that its not my kind of stuff...:)
         Now when recipe suggestion was there...I send a cupcake recipe to Swathi...She suggested to send a recipe with pumpkin...Now that was the initial shock I got...After some search I opted this as something with chocolate chip would never be terrible..So sent the recipe from Joy of baking which is  adapted from Baking from the Heart, a collaborative cookbook with Michael J Rose.
         Now that I have send a recipe...I have to check if it works..Means I have to bake it...:) Now when I told that to my hus..he also  reacted like me...Pumpkin???? Muffins....blah blah blah....Anyways I had to try it...before anyone did...So went ahead with the preparation...and the muffins were gud, soft and delicious...But the thought that it had pumpkins had effected me and my hus...so we settled by eating just 3..The rest everything was eaten by my son who just loved it..Not sure what..May be the chocolate chips that where there around which appeared each time he took a bite.
       As for the recipe...the muffins were soft and there was no trace or smell of pumpkin. Chocolate chips did bring a difference in it and there was the aroma of spices all around after baking it...yeh the muffins had loads of them too...:)..Thanks Swathi for selecting this recipe..
     Now the muffins took 3 days to get over...They were gud till then...I dint dare to bake other delicious recipes there...May be will try it later as I have almost a can of pumpkin puree...Gals will let you know once baked..:)
As for the recipe I dint make any major replacements as I had never tasted it before..and the clicks..I went crazy with the leaves and what to say...you can see them below...:)


All purpose flour-  1/2 cups
Baking soda- 1 tsp
Ground cinnamon- 1 tsp
Ground ginger- 1/4 tsp
Ground cloves-1/4 tsp
Freshly ground nutmeg- 1/4 tsp
Salt- 1/2 tsp
Unsalted butter- 1/2 cup room temperature
Granulated white sugar-1 cup
Eggs-2 large
Pure vanilla  extract-1  tsp
Canned pumpkin  puree-3/4 cup solid packed
Semisweet chocolate chips-1 cup


Method of Preparation:
1. Preheat oven to 350 degrees F (177 degrees C). Place rack in the middle of the oven. Line 12 muffin cups with paper liners.
2. In a large bowl, sift together the flour, baking soda, ground spices, and salt.
3. In the bowl of your electric mixer, or with a hand mixer, cream the butter and sugar until light and fluffy.
4. Add the eggs, one at a time, beating well after each addition. Beat in the vanilla extract. Mix well.
5. With the mixer on low speed, alternately add the flour mixture and pumpkin puree, in three additions, beginning and ending with the flour mixture. Fold in the chocolate chips.
6. Fill the muffin cups evenly with the batter using two spoons or an ice cream scoop.
7. Place in the oven and bake for about 18 - 20 minutes, or until firm to the touch and a toothpick inserted in the center of one of the muffins comes out clean.
8. Place on a wire rack to cool.


Notes:
1. I halved the recipe and got 8 muffins.
2. Used small chocolate chips.So reduced the amount of it.
3. The muffins took about 20- 22 mins to bake. The tops turned brown at about 18 mins. so covered them with foil.
4. According to Joy of Baking: The batter can be baked in a 9-inch (23 cm) loaf pan. Butter or spray the loaf pan with a non stick vegetable spray. Bake the loaf in a 350 degree F (177 degree C) oven for about 50-60 minutes or until a toothpick inserted in the center of the loaf comes out clean.
5.I used store bought pumpkin puree.
6. To make pumpkin puree at home(Joy of baking): First cut the pumpkin in half lengthwise, remove all the seeds and stringy fibers, and then place cut-side down on a greased baking sheet. Bake at 350 degrees F (177 degrees C) for approximately 45 minutes to 1 1/4 hours (depending on size) or until easily pierced with a knife. Scoop out the pulp and puree in a food processor until smooth.To extract all the liquid, so strain the pumpkin through a cheesecloth lined strainer and then cool the puree before using.


Done by:

ShareThisFinal

LinkWithin

Related Posts Plugin for WordPress, Blogger...